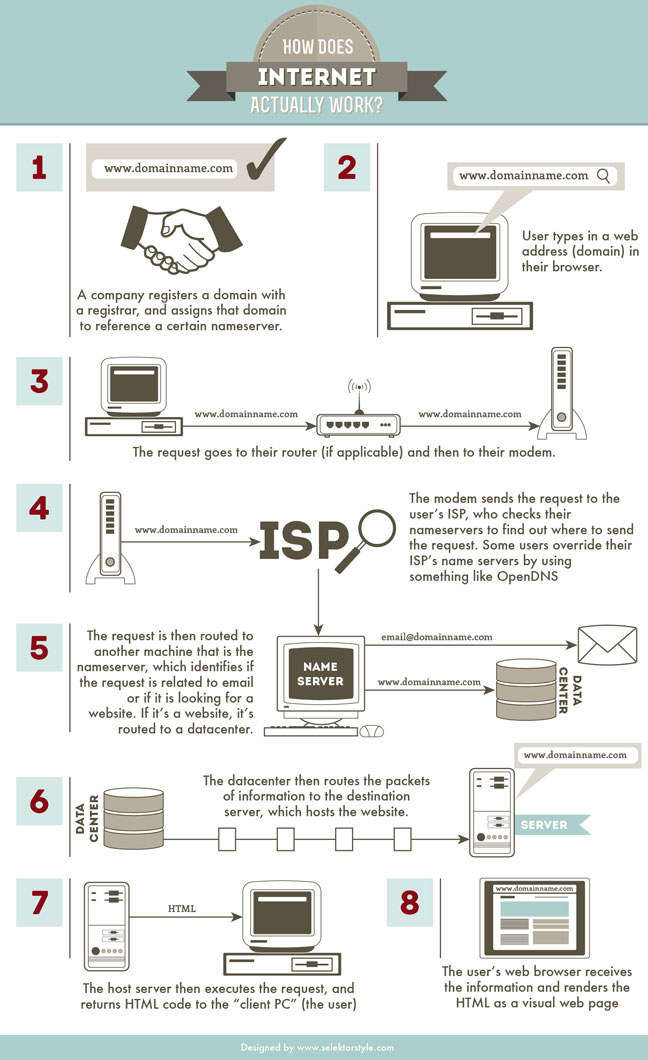
Week 01: History of the web and how it works


<p></p> tags will have a font size of 24 pixels, and be colored green.doctype, html, head, and body.doctype declaration tells web browsers which version of HTML it will use and is placed at the very beginning of the HTML document. After the doctype declaration, html tags mark the beginning and end of the web page.head tags is not visible on the web page itself. Only content within the body tags are visible on the web page.
<!-- Link to an external website. -->
<a href="http://www.example.com"]]
>
Example website</a>

<!-- Link to an internal website in same directory. -->
<a href="home.html"]]
>
Home</a>
<article> – The article element defines a self-contained composition within a page.
The following example shows the basic structure of an article using article, header, and footer elements.
<article>
        <header>
                <h1>Article Heading</h1>
        </header>
        <p>Article Text</p>
        <p>...</p>
        <footer>Article Footer</footer>
</article>
<aside> – The aside element indicates content that is only tangentially related to the rest of the content.
The following example shows how an aside is used to mark up background material on Switzerland in a much longer news story on Europe.
<aside>
        <h1>Spain</h1>
        <p>Spain, s a sovereign state and a member state of the European Union.  It is located on the Iberian Peninsula in southwestern Europe. Its mainland is bordered to the south and east by the Mediterranean Sea except for a small land boundary with Gibraltar.</p>
</aside>
<b> – The b element historically was used to tell the browser to make the nested text bold. In HTML5, it merely signifies that the text should be stylistically distinguished in some way.
This example uses the b element to make the ‘text’ bold.
<p>this <b>text</b> appears bolded</p>
<br> – The br element forcibly breaks (ends) the current line of text, without starting a new paragraph.
This example correctly uses the br element.
<p>
        D. Holmes<br>
        42 Wallaby Way<br>
        Sydney
</p>
<button> – The button element defines a clickable button.
This example correctly uses the br element.
<button name="button">
Click me</button>
<div> – The div element is a generic block-level container that has no semantic value other than the one that you give it via id or class attributes. It can be used for a variety of purposes including the styling of common elements, or for grouping elements with common attributes.
This example shows two DIVs, one inside the other, that define a main content section, then a subsection within that. Each DIV is semantically defined using a class or ID.
<div id="mainContent">

        <h1>The HTML Times</h1>
        <div class="sportsSection">

                <h2>Sports</h2>
        </div>
</div>
<figure> – The figure element represents self-contained content, optionally with a caption, that can be referenced as a single unit from the main content of the document.
<figcaption> – The figcaption defines a caption or legend for a figure element.This element is new in HTML5.
<fieldset> – The fieldset element is used to group related elements in a form. Typically, the browser draws a box around the text and other elements that the field set contains.
<footer> – The footer element was introduced in HTML5 for modeling the footer sections of real-world documents. The basic motivation for introducing the footer element was to eliminate the overuse of <div> elements and creating a suitable element for the links and text that are usually located at the bottom of the webpages
This example shows two DIVs, one inside the other, that define a main content section, then a subsection within that. Each DIV is semantically defined using a class or ID.
<body>
        <!-- First footer -->
        <footer>
                <a href="../">
Back to index...</a>
        </footer>
        <h1>Lorem ipsum</h1>
        <p>Insert long article here.</p>
        <!-- Second footer -->
        <footer>
                <a href="../">
Back to index...</a>
        </footer>
</body>
<form> – The form element defines an HTML form for user input, subsequently to be submitted to a website or service.
This example uses the form element to create a basic form containing a text entry box for the user’s name and a select control for choosing a favorite movie. When the user clicks the Submit button, the form sends the data to the URL listed in the action attribute. The value of the method attribute determines how to send the data to the server.
<body>
    <form action="http://example.microsoft.com/sample.asp" method="post">

        enter your name:
        <input name="fname"><br>
        favorite ice cream flavor:
        <select name="movies">

            <option value="Star-Wars">
               Star-Wars
            <option value="Star-Trek">
               Star-Trek
            <option value="Space-Balls" selected>
               Space-Balls
        </select>
        <input type=submit>

   </form>
</body>
<html> – The html element () represents the root of an HTML document.
The html element is used to contain a complete HTML document.
<!DOCTYPE html>
<html lang="en">

        <head>
                <meta charset="utf-8">

                <title>An Example Web Page</title>
        </head>
        <body>
                <h1>Hello World!</h1>
                <p>This is an example web page marked up using HTML.</p>
        </body>
</html>
<head> – The head element () represents a collection of metadata for the document.
The head element is contained by the html element and contains the title element.
<!doctype html>
<html lang="en">

        <head>
                <meta charset="utf-8">

                <title>The HTML Document</title>
        </head>
        <body>
                <p>The HTML content</p>
        </body>
</html>
<header> – The header element represents the header of a section.
<article>
        <header>
                 <h1>The HTML Document</h1>
        </header>
        <p>The HTML content</p>
</article >
<hn> – The h1 through h6 elements define levels of headings within a document.
<!-- The H1 element applies a  level-1 heading syle to the  contained text. -->
<h1>Welcome to Web Platform Docs!</h1>

<!-- H2 is used for level-2 headings. -->
<h2>Introduction</h2>

<!-- etc. -->
<h3>Prologue</h3>

<h4>Level-4 Heading</h4>

<h5>Level-5 Heading</h5>

<h6>Level-6 heading, smallest heading avaliable</h6>
<hr> – The hr element represents a paragraph-level thematic break in text. (“HR” stands for “horizontal rule”, but browsers are not required to use a horizontal rule to represent this element.)
This example uses the hr element to create a “paragraph-level thematic break”.
<p>This is a paragraph.</p>
<hr>
<p>With a “paragraph-level thematic break”.</p>
<i> – The i element historically was used to indicate that the text should be rendered in Italic type, where available. In HTML5, it indicates that the text is in a different voice or mood, or otherwise offset, from the surrounding text .
This example uses the i element to make the text appear in italic type.
<i>This text is italic.</i>
<img> – The img element embeds an image in a document. The <img> element can be nested in an <a> element to create an image that links to another page or section. Alternatives to the <img> element include setting the background-image property of an element
This example shows how to use the img element to embed an image on a page.
<img src="logo.gif"width="420"height="120"alt="MyCorp Logo">
<input> – The input element is a multipurpose element for representing form widgets. The type of widget depends on the type attribute of the element .
This example uses the input element to create different types of input controls.
<form action="http://example.org/survey"method=post>

        Name
        <input name="control1"type="text"value="Your Name">


        Password
        <input type="password"name="control2">


        Color
        <input type="radio"name="control3"value="0"checked>
          Red
        <input type="radio"name="control3"value="1">
          Green
        <input type="radio"name="control3"value="2">
          Blue

        Comments
        <input type="TEXT"name="control4"size="20,5"maxlength="250">


        <input name="control5"type=checkboxchecked>
          Send receipt
        <input type="submit"value="OK">

        <input type="reset"value="reset">

</form>
<button> – The button element defines a clickable button.
<input type="button"value="Click me">
<<checkbox> – The checkbox type of the element represents a state or option that can be toggled.
This example uses the INPUT type=checkbox element to define a checkbox.
<input type="checkbox" name="toggle" value="Toggle me">
<nav> – The HTML Navigation Element represents a section of a page that links to other pages or to parts within the page: a section with navigation links.
The following example uses the nav element to indicate that a list contains site navigation links.
<nav>
        <h1>Site Navigation</h1>
        <ul>
                <li><a href="index.html">
Home</a></li>
                <li><a href="gallery.html">
Photo</a></li>
                <li><a href="news.html">
Updates</a></li>
        </ul>
</nav>
<ol> – Draws lines of text as a numbered list.
This example uses the ol element to create a numbered list.
<ol>
        <li>This is the first list item</li>
        <li>This is the second list item</li>
</ol>
<ul> – Draws lines of text as an unordered list, usually bulleted.
This example uses the ul element to create a list.
<ul>
        <li>This is the first list item</li>
        <li>This is the second list item</li>
</ul>
<li> – Denotes one item in the list
This example uses the li element to create individual items on a list.
<ol>
        <li>This is the first list item</li>
        <li>This is the second list item</li>
</ol>
<p> – The p (for paragraph) element represents a paragraph.
This example uses the p element to create a paragraph.
<p>This is a paragraph.</p>
<script> – The script element enables dynamic script and data blocks to be included in documents. It can contain code/data directly or it can link to external sources. It is mainly used with JavaScript.
Loading an external script.
<script src="http://example.com/Script/Url/here.js" type="application/Javascript"></script>

Writing an inline script.
<script type="application/Javascript">

     //Do stuff...
</script>
<section> – Defines sections in a document, such as chapters, headers, footers, or any other sections of the document. It is new to HTML5.
In the following example, an article (part of a larger document about apples) contains two short sections.
<article>
        <section>
                <h1>Red Delicious</h1>
                <p>These bright red apples are the most common found in many  supermarkets.</p>
        </section>
        <section>
                <h1>Granny Smith</h1>
                <p>These juicy, green apples make a great filling for  apple pies.</p>
        </section>
</article>
<small> – Defines inline text that will appear small. Used for fine print.
This example uses the SMALL element to display text in a smaller font.
<p><small>This is text is smaller</small> than this text.</p>
<span> – Groups inline elements in a document. The span element is both style and semantics neutral; it does not assign any style attributes or semantic meaning on its own.
This example uses the span element to create an inline text container that changes the color of a word to blue.
<p>This paragraph contains a single <span style="color: blue">
blue</span> word.</p>
<strong> – Defines important text. Renders as bold.
This example uses the span element to create an inline text container that changes the color of a word to blue.
<strong>This text is strongly emphasized</strong >