introduction to HTML forms
Anyone who has been on the internet has seen and used a web form. But very few people have coded one in HTML. Any time you have made a purchase on the internet or filled out a contact page, you have used a web form. When you enter your text or numbers into a text box and click the submit button. The data is used somehow, for example payment details being stored in a database.
Basic form code:
<form>
        Name: <br>
        <input type="text" name="name" id="name" value=""/> <br>
        Email: <br>
        <input type="email" name="email" id="email" value=""/> <br>
        Comments: <br>
        <textarea name="comments" id="comments" cols="25" rows="3"></textarea> <br>
        <input type="submit" value="submit"/>
</form>
This is what your form will look like:

Forms are relatively easy to create but submitting forms usually require some type of processing script. As you read the code, you’ll see an opening <form> tag, a </form> closing tag, and some bits in between the two. The element contains three inputs in which you can enter information: two single line text inputs, and a multiline text input.
Lets look a little closer at each element.
The
<form> elementThe <form> element is needed to wrap the form — without it you don’t have a web form. The
<form> tag can have a few attributes, but please do note that you can’t nest forms inside each other.
The
<input> element<input>: This element defines an area or text-field where you can insert information in some way.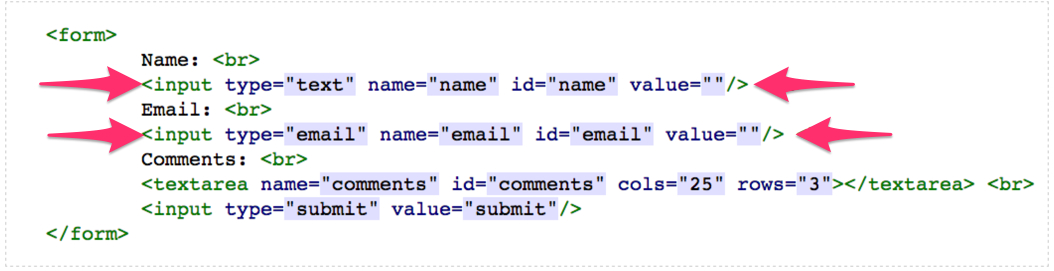
The
type attributeThere are different
types of <input> element that we’ll look at later, but in this case we are using <input type="text"> and <input type=”email”> to specify that we want single line text and email input fields (the type attribute is mandatory). We have also put “name” and “email” labels next to them, to give our site visitors an indication of what data we’d like them to enter there.
The
name attributeEvery
<input> element must also have a name attribute that you the developer can decide on. The name attribute is needed for the database or other data destination to uniquely identify that piece of data. When the form is submitted, most scripts use the name attribute to place the form data into a database or into an email that can be read by a person. Thus, if the <input> element is for the site visitor to enter their name into, then the name attribute would be name="name" or name="first-name", etc.
The
value attributeEvery
<input> element should also have a value attribute. The value this attribute takes depends on the element it is being used on. In the case where the value is whatever the user types in, the value attribute can be set to blank —value="" — this will tell the processing script to just insert whatever the site visitor types into the box. If you do enter a value into the value attribute, it will appear in the text input as an initial value that the user can then overwrite.In cases where there is only one value so the user doesn’t enter anything, such as submit or hidden, you set the value to equal the final input. For example, you can set
value="yes" to have the initial choice of a yes/no radiobutton pair set to yes. And you’d use value="submit" for a submit button
the
<textarea> elementThis provides a multiple line text input area, and you can even define how many lines are available to enter text into. Note the
cols and rows attributes — these are required for every textarea element, and specify how many columns tall and rows wide to make the text area. The values are measured in characters.<input type=”submit”>
An
<input> element with the attribute value="submit". Instead of rendering a one line text box for input, the submit input will render a button that, when clicked, submits the form to whichever target the form has specified to send its data to.
The
method attribute: telling the data how to travelwhen you press the submit button on a form the method attribute defines how the form data is sent to the processing script. The two most commonly used methods are “GET” & “POST”.
- The “GET” method sends form data within the web page’s URL (sometimes you can see URLs along the lines of
http://www.website.com/index.php?data1=value1&data2=value2; these are different bits of data being sent via the “GET” method). You shouldn’t use the “GET” method because anyone can see the information being sent inside the URL. So if you don’t have a good reason for using “GET”, it is probably best to not use it. - “POST” sends the data via the script that powers the form, either to an email that is sent to the site’s administrator, or a database to be stored and accessed later, rather than in the “GET” URL. “POST” is the more secure and usually the better option.
- If you are very concerned about the security of the data in the form, for example if you are submitting a credit card number to a shopping site, then you should use the https protocol with a secure socket layer (SSL). Basically, this means that data will be sent over the https protocol, not the http protocol. Have a look at the URLs next time you are paying for something on a shopping site, or using online banking — you’ll probably see
https://in your address bar, nothttp://. The difference is that an https connection is a bit slower to transmit than http, but the data is encrypted, so anyone hacking into the data connection can’t make any sense out of it while it is in transit.
Styling forms and submitting data is hard, lets do it the easy way
Nowadays you don’t have to have programmer on staff just to build your web forms and organize your data. Many services have sprung up that allow anyone to quickly and easily build a web form using drag-and-drop functionality. Often these form services offer a robust data management system to parse all your responses and organize them according to your preferences.
There are many of online form building services. These are few of the top ones at the moment:
For the purposes of this demo we will use wufoo. But feel free to use which ever online form builder suits you best.