Styling forms and submitting data is hard, lets do it the easy way
Nowadays you don’t have to have programmer on staff just to build your web forms and organize your data. Many services have sprung up that allow anyone to quickly and easily build a web form using drag-and-drop functionality. Often these form services offer a robust data management system to parse all your responses and organize them according to your preferences.
There are many of online form building services. These are few of the top ones at the moment:
For the purposes of this demo we will use wufoo. But feel free to use which ever online form builder suits you best.
Wufoo Interface Overview
The interface for the form builder is divided into two halves—the right half is a preview of your form while the left half is for editing and building your form.
The left half has three tabs. The Add a Field tab shows the field types available in Wufoo. Click a field type button or drag it to your preview pane to add the field type to your field.
The Field Settings tab allows you to edit the settings for each specific field. Click on a field in the preview pane to start editing that field.
The Form Settings tab allows you to change the properties of the overall form. Click that tab, or the title of your form to edit these properties.
At the bottom of the form builder is the button to save your form.

Adding a Field
To add a field to your form, click on the “Add a Field” tab located at the top left of the building pane. This will bring the field menu into the building pane. Likewise, if your form has at least one field, you can click the “Add Field” button located at the bottom of the preview pane.
Once you have the field menu on the building pane, you can click on the name of the field you would like to add. For example, you could click “Single Line Text,” and this will add a single line text field to your form. Each field that you add is placed directly below the previous field. You can also drag the name of the field directly to the location in the preview pane where you would like the field to be located.
See the list of field types to explore the different possibilities – (http://help.wufoo.com/articles/en_US/SurveyMonkeyArticleType/Field-Types)
Editing a Field
After you have added a field, you can then edit the properties of that field. Properties of a field range from title and instructions to randomization and formatting. To bring up the field properties, just left click on the field in the preview pane. This will populate the builder pane with the field property interface.
Descriptions of each type of field including how it is validated can be found in the field type documentation – (http://help.wufoo.com/articles/en_US/SurveyMonkeyArticleType/Field-Types)
Each type of field property is full explained in the field settings documentation – (http://help.wufoo.com/articles/en_US/SurveyMonkeyArticleType/Field-Settings/)
Form Settings
Every form has a set of properties including what you would like to happen when the user hits the submit button, a description for your form and determining what emails get sent out on submission among other features. To access your form properties you can either click on the form name in the preview pane or you can click the “Form Settings” tab in the upper left hand corner of the building pane. Upon clicking, the form properties panel will appear in the building pane.
For an in depth explanation of all form properties, view the form settings documentation – (http://help.wufoo.com/articles/en_US/SurveyMonkeyArticleType/Form-Settings)
Reorder, Duplicate and Delete
There are three actions you can perform from the preview pane: reordering, duplicating, and deleting fields.
Reorder – To reorder your fields, left click and hold on the area surrounding the field. Then drag the cursor up or down to the position you would like the field to be in. When you left go of the left mouse button, the field will snap into its new position. Be careful not to click the orange arrow or the field itself as those spots will not drag the field. Only the surrounding area, which turns yellow if you click on it, can be dragged.
Duplicate and Delete – Click on a field to make it the active field. You can recognize this by a yellow box surrounding the field. At the bottom right corner of the yellow box are two icons: a ‘+’ and a ‘-‘. The ‘+’ is duplicate and the ‘-’ is delete. Pressing ‘+’ will create an exact copy of the field directly underneath it. Pressing ‘-‘� will delete the active field. If the field had been previously saved (meaning data may have been submitted to it) then you will be prompted to confirm the deletion. Otherwise, the field will just be deleted.
The Form Manager
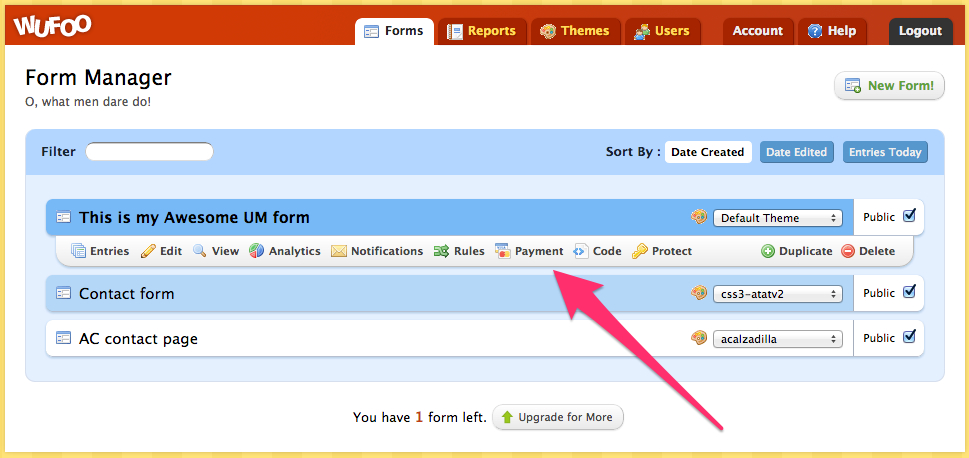
The form manager page is the first page you will see upon logging in to Wufoo. It is a listing of all of the forms you have created, along with different actions you can perform on each form. Additionally, you may view statistics on your forms, and begin creating new forms from this page.
Requirements
To use the form manager, you will need a Wufoo account. In addition, most of the actions and settings will only be available if you have at least one created form. If you do not have any forms, you can create one from here.
Interface Overview
You can get to the form manager from any page in Wufoo by clicking the Forms tab at the top.
The form manager interface displays all the forms on your account in a vertical list. To edit a form or any of its properties, hover over the form to view the taskbar buttons.
If a form has new entries today, next to the title will be an icon that displays how many entries have been received today.
A box to filter your forms by title is located in the upper left of the page. In the upper right of the page, there are buttons for creating a new form, viewing form statistics, and sorting your list of forms. These settings will remain the next time you login, so if you can only see some of your forms, make sure the filter box is cleared.
Creating a New Form
Click the “New Form!” button at the top right of the page to create a new form. Doing so will take you to the form builder. After you save your form in the form builder, it will appear in the Form Manager. Each form you create will have the following properties:
Unique URL – Wufoo hosts every form for you, so each form is given a unique URL that you can share. This URL is based off of the form name, and will be in the following format: http://username.wufoo.com/forms/form-name/ where username is your Wufoo username, and form-name is the name of your form. Please note that unique URL’s are only relevant if your form is public.
Secure Forms – If you have a paying plan that includes secure forms, they will automatically be converted to a secure URL (https) if someone tries to access the unsecure URL (http).
Defaults to Public – A public form means that anyone can fill out your form. When you create a form, it will automatically be set to public.
Form Limit – Each plan has a limit on the amount of forms you can create. Creating a new form will count as 1 form towards this limit. You can find out how many forms you have left by looking at the message located at the bottom of the form manager.
Managing Your Forms
Each form has a number of settings and properties that can accessed by hovering over the form’s name. The following is a breakdown of all actions that can taken for each form in the Form Manager.

Entries – An entry is the word we use to describe 1 submission to your form. This link will take you to the Entry Manager, which will allow you to browse, edit and delete all of your entries.
Edit – This link takes you to the form builder where you can modify your form.
View – This icon only appears if the form is public. Every public form has a URL associated with it. Clicking this link will take you to the public version of the form.
Notifications – Wufoo’s notification system allows you to control the various ways in which you can receive updates about new form submissions. Currently, Wufoo supports email, RSS, and mobile alerts.
Payment – Wufoo’s payment integration allows you to direct your users to a payment gateway like Authorize.net, Google Checkout and Paypal after they submit a form.
Code – The code manager presents you with multiple options for placing a form on your own site.
Protect – This will allow you to set a password on your form. People will have to enter the password before they are able to view and fill out your form. This is only available if your form is public and you have a paying plan.
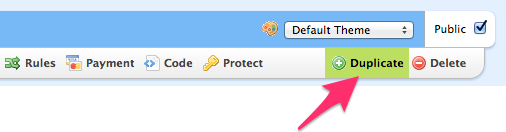
Duplicate/Delete – The ‘+’ and ‘-’ icon over to the right allow you to duplicate or delete a form. Deleting a form will require confirmation, and duplicating a form will create a new form with the same name and ‘Copy’ appended on the end. Duplicating a form counts as a new form and will decrease the number of forms you have available to your account by one.
Public and Private – Toggle this checkbox to switch between a public form (anyone can fill it out) and a private form (only you can fill it out).
Themes – The drop down box over to the right controls the look of your form. We provide a default theme that is what you see selected, but you can also make a theme with the Theme Designer and then select the theme from the drop down. No pressing of a save button is necessary. Once you select a theme from the drop down, it will be applied to the form.
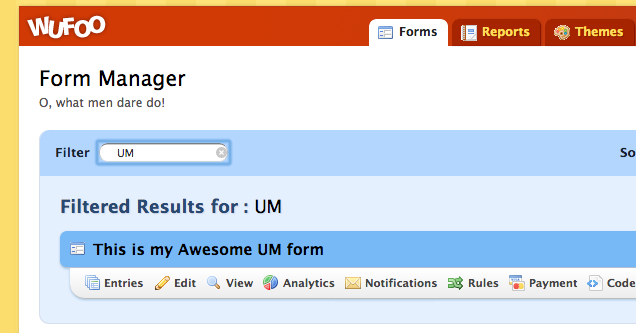
Filtering and Sorting Your Forms
Options for filtering and sorting your forms are located at the top of the form manager. On the left side, type in the filter box to narrow down the forms. Only forms whose titles contain the filter text will be shown.
The right side has three buttons for sorting your forms: date created, date edited, and the number of entries a form has received today. If you sort by entries today, any forms that have not received entries will be sorted in alphabetical order.

Public, Private, and Password Protected
Using the checkbox located at the far right of the form name, you can toggle a form between public and private. You may also designate a public form as password protected using the Protect button underneath your form. Here is the difference between the three:
Public – A public form can be filled out by anyone. They can go to the URL of your form and submit an entry just as you can. This is the default setting for all Wufoo forms. Also note that a form must be set to public in order to include it on your blog or website.
Private – A private form can only be filled out by someone with access to your Wufoo account. In other words, they have to be logged in to your account in order to fill out the form. If someone tries to go to the URL of your form, they will receive a message saying the form is not public. If you would like to add entries to your form, you will access the form in the entry manager.
Password Protected – Using the Protect button you can set a form as being password protected. If a user tries to access your form, they will be prompted to enter a password in order to view the form. This setting is optimal if you wish for others besides yourself to fill out a form, but do not want it open entirely to the public.
How do I duplicate or delete an existing form?
In the form manager, hover your mouse over your desired form. Notice two options appear over to the right: Duplicate with a green plus sign and Delete with a red minus sign. Click the duplicate button to create a new duplicated form, and the new copy will have the same form title with the word “copy” attached to the end. Clicking delete will delete your form and all entries collected through that form.